Northern Renaissance Instruments
INSTRUMENT MAINTENANCE WITH RESPECT TO STRINGS
Some early players left all aspects of instruments maintenance, including tuning, to servants. Others, like Thomas Mace, did much themselves, including taking the soundboard off to fix loose bars inside. Today, there is still a wide spectrum of what maintenance tasks players will do for themselves, and what they will leave to others. This little manual gives instructions for those aspects of instrument maintenance that relate to the strings. Most players nowadays only tune their strings and replace broken ones themselves, while some, who are competent with the use of tools and abrasives, can do all of the jobs mentioned here without the help of others. The player must use his or her judgment about this. The purpose here is both to present what needs doing clearly enough so that players can do as much of it themselves as possible and, if done by another, to provide the knowledge for constructive interaction with that person.
A: REPLACING INDIVIDUAL GUT STRINGS
1) Tail Fixing
Thicker plain gut strings can usually be secured by a simple knot underneath the tailpiece if the knot is considerably bigger than the hole (or the slot extending from the hole) that holds it. This is shown here:
Wound strings come with a knot and a loop. They can be fixed to the tailpiece using the knot in the same way, but they can also be fixed using the loop, as shown here:
Thinner plain gut strings can be fixed by tying knots on top of knots to get the lump on the end thick enough, but it is easier and safer to make a loop to tie to the tailpiece.
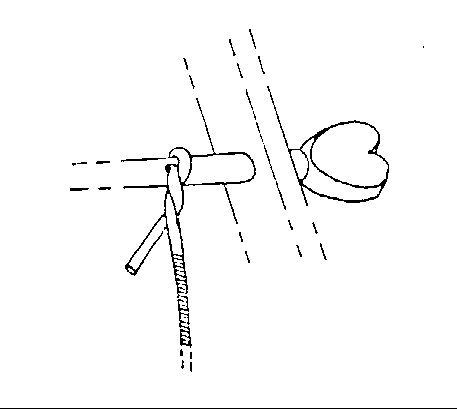
To make a loop at the end of a string, first tie a knot or burn a lump with a candle (or lighter flame or the tip of a soldering iron) at the very end. Tie another knot about 15 mm from the first for a violin, viola, or treble viol, and about 25 mm from the first knot for a cello or bass viol. Pass the knotted (or burned) end through the second knot while it is still loose, and tighten the knot enough so that the end will not pull through. This stage is shown here:

Then stick a round object in the loop and pull tight.
If one has made the loop before thinking about attachment to the tailpiece, or if one has a wound string with loop provided, one has to thread the other end of the string through the tailpiece hole from the underside before putting it through the loop. Finding the hole to stick the end in can require several attempts because usually it can't be seen. Bending a kink near the end can help. The threading-through needs to be done carefully because any kink created on the string can ruin it. With plain gut strings, one can avoid this nuisance by sticking the end in the hole from the topside of the tailpiece at the beginning, and making the loop with the string in the tailpiece hole. The fixing of the string is completed by threading the other end of the string through the loop and pulling tight.
Strings often break because there are edges on the tailpiece that force the string to bend very sharply over them. Check for these, and if there are such sharp edges, round off every edge that the string bends over.
2) String fixing to the bridge
Most early plucked instruments (like lutes and guitars) have holes in the bridge parallel to the soundboard for fixing the strings to. The procedure is to thread the end of the string through the hole from the nut side (A), then take the emerging end (at B) back over the top to the nut side, then under the string going into the hole, back up again on the other side of the string, then over the top again (parallel to the bit of string already there), and finally one tucks the end under the string (that is already there) on the back (tail) side of the bridge, and pulls tight. Press a finger against the end of the string in the tuck while one pulls tight to make sure the tuck remains on the back side of the bridge since, until it is tight, the tuck-in can very easily wander back onto the top. The tie is illustrated here:

If the tuck-in pulls out when one pulls the string tight, this could be because of a fault in the bridge design. The end of the string is prevented from sliding out of the tuck by a sharp kink at the corner between the top and back sides of the bridge (at X). If that corner on the bridge is not sharp and/or is much more than 90 degrees in angle, there often is not enough of a kink to stop the sliding. A typical cross-section of an early lute bridge looks something like:

A variation in the fixing procedure makes the the holding of the kink before the tuck less crucial. That is, when one runs the end region of the string back over the top of the bridge after going under the part of the string going into the hole, instead of running it parallel to the other bit of string already there, one winds that end region 2 or 3 times around the bit of string already there before going over the corner to the back and tucking the end under that other bit of string on the back.
The height of the string over the soundboard where it leaves the bridge is very much affected by the loop that goes under it there. If after the string is mounted and tuned up, its height does not fit in with the heights of its neighbouring strings, one can usually adjust the height of the loop by detuning some, grabbing the string right next to the loop, and tugging it in the direction one wants it to go. It usually then stays where it was tugged to when tuned up again.
3) String fixing to the peg
Make sure that the string path between the hole in the peg and the string in its proper place on the nut does not catch or lean on the similar path of any other string. An easy way to ensure this is to pull the peg out so that the string hole is at the wall of the pegbox, to the side of all of the other strings that go past it, before putting the string end into the hole.
Make a twist like this:
or a knot around the peg (by getting the end out in front of the peg, put it over the string, and then under the string closer to the peg, and pull out tight away from the nut). This stops the string from slipping in the peg hole when tuning up. Both the twist and the knot can be done in either of two directions. Try to get the direction right so that the free end of the string leads away from the peg head so that during subsequent winding of the peg, the coiling up of the free end doesn't interfere with the coils tightening the string.
Turning the peg should be accompanied by pushing it in to prevent subsequent slipping of the peg in its hole in the pegbox. Avoid leaving too much string to be wound onto the peg since it can jam up against the side of the pegbox, which can both hinder turning and shorten the life of the string. To prevent jamming, it is often possible to hold the peg from untwisting while partially pulling it out, thus using the side of the pegbox to push the most recently wound coils of string down the peg when it is pushed in again. If the coils are too tight to slide this way, detune the string just enough so that they can.
A different approach was taken in the method Flesch gave in his famous violin tutor (1923) for quick tuning while playing. There one deliberately jams the string against the side of the pegbox, just tight enough so that one can quickly tune by just turning the peg without the usual need for also pushing the peg in at the same time. Clip off excess ends, since if left in the pegbox they can cause annoying buzzes during playing.
4) Tightening the strings
If there are any signs of the string sticking in a bridge or nut groove as the string is being tuned up, rub a little dry soap or graphite (pencil 'lead') onto the groove. Such lubrication is more necessary for unwound gut strings with our BEST treatment than for those without. Several applications may be needed. Wood can absorb the lubricant, and the string can wipe it away, especially at the nut. If there is no time for lubrication at the time, or lubrication is not available, one can help the string by periodically easing it over the grooves during the tuning, as discussed below.
Easing the string over the bridge and nut groove during tuning up is especially important with open-wound or tigerline strings, where sticking can be most difficult to prevent. and most damaging. To do this on the bridge, one can usually put a finger under the string on each side of the bridge and lift it out of the groove (this can be a hard pull, and make sure that the counter-force is not against the soundboard at any place except its edges). If the purpose is to ease the string over a sticky groove, one pushes the string towards the nut and drops it in the groove again. If the purpose is to expose the groove surface for lubrication, drop it on the top of the bridge between grooves. One can usually squeeze two fingers between the string and the fingerboard and similarly lift it out of the nut groove (for either purpose). Regular groove lubrication is necessary, and doing it whenever one changes a string is a good habit to develop.
B: REPLACING GUT STRINGS A WHOLE SET AT A TIME
All of Section A: above is fully relevant, but there are additional considerations here. On bowed instruments, it is best to remove strings one at a time, have any necessary work done on the peg, nut, bridge and tailpiece, and fit and tune up the new string before removing the next old string. This minimises the risk of the soundpost becoming dislodged.
This also reduces the likelihood that tuning up the strings will tilt the bridge towards the nut, away from its proper angle sitting on the soundboard. If this has happened anyway, and if the grooves are well shaped and lubricated, one can tune the strings down a tone, hold the bridge firmly with a hand on each side of the strings, and pull it into its proper position. If tuning up again returns some of the tilt, one again slides the bridge top under the strings to the right position (if one has the courage to do it at full tuning) or enough past that position (if one tunes down first) to compensate for the bridge movement on tuning up again. If strings stick, this kind of manipulation of the bridge can damage its top, so care is required.
On plucked instruments, the main problem with taking all of the strings off first before replacing them is finding the nut after it has fallen on the floor.
When there is a pegbox free of strings to start with, there is less that gets in the way if one fits the strings with pegs closest to the nut first, and works one's way up the pegbox.
C: REPLACING STRINGS WITH OTHERS OF DIFFERENT THICKNESS
1) The peg
There is no problem fitting a thinner string in a bigger hole in a peg. If one wants to fit a thicker string than the peg hole will allow, the peg hole needs to be drilled out to a larger diameter. If the required hole is more than a third of the peg diameter at that point, this is not advisable since the peg would become too weakened. Then the only recourse is to knot the string to a thinner one that will go through the peg hole. The knot should end up in the pegbox and not winding around the peg or on the nut or on the vibrating side of the nut. Holding the peg for drilling is simplest when it is in its place in the pegbox.
2) The nut
The placing of the groove in the nut controls the position of the string over the fingerboard, and the depth of the groove controls the height over the fingerboard of the bottom of each string. It is the bottom of the string and its distance from the frets or fingerboard that is important in determining the left-finger force needed to stop the string cleanly and how hard the string can be played and still avoid the string slapping against the frets or fingerboard. Setting the 'action' involves getting these distances 'right' over all of a fingerboard for a particular style of playing. If the action was good before, don't change it.
A good guide to whether the nut is at the right height on an instrument with frets is to observe the shadow of the string on the frets when illuminated by a single light in an oblique direction (so the displacement of the shadow from the string itself is quite magnified). Then compare this displacement at the second fret when fingering the first with the displacement over the first fret of the unfingered string. The latter should be no less than, and no more than slightly more than, the former.
There is no change needed at the nut when changing from a thicker to a thinner string. If one is changing from a thinner to a thicker string, check whether the groove is wide enough according to the criterion in Section F, shown in Figure 6. If it is not wide enough, widen it, making sure NOT to deepen it as well. If the string is one of a unison or octave pair, widen the groove only on the side that is opposite to the companion string. This prevents the strings of a pair from getting closer and thus be more likely to slap against one-another during playing.
With bent-back pegboxes as with lutes, it is usually possible to put the guiding grooves on the pegs side of the nut, with no groove at all where the string leaves the nut on the bridge side. With this arrangement, the groove depth is irrelevant, and the height of the strings over the fingerboard is easily adjusted by a file across the top of the nut, or a shim of paper or card under the nut
3) The bridge of a bowed instrument
The height of the bottom of the string at the bridge does effect the action (the string clearance over the fingerboard or frets), but a mm or two won't make much difference (while tenths of mm's do make a difference at the nut). What is critical at the bridge is the top of the string and how it affects the bow clearance angle. The bow clearance angle is defined as the range of angle in holding the bow (at low bow pressure) that one has around that string and still not bow a neighbouring string at the same time. This affects the accuracy in holding the bow that is needed in bowing that string, and how much one can dig into the string while playing it without bowing neighbouring strings. It also affects the ability to bow only that string when fingered in a high position when not fingering any adjacent string.
A way of measuring the clearance angle simultaneously for two adjacent strings is to hold the bow lightly across both of them and measuring the closest distance between the bow (hair) and the next string along on either side (the sine of the clearance angle is that distance divided by the distance between centres of the relevant string and the next string along).
On treble instruments, the clearance angle is usually set the same across the instrument, but on bass instruments, the clearance angle is set to increase from the centre string (or the one below the centre if the number of strings is even) towards the lowest one (to allow for more digging in).
If the new string is thinner than the one it replaces, the clearance angle around it decreases. Check to see if this is serious. If it is, put shims (paper, cardboard, an old string, a splinter of wood, or whatever) under the string in the bridge groove until the clearance angle is right compared to its neighbours. This is a temporary fix. To do it permanently, file the surface of the bridge groove to a convenient shape for filling and to make it clean for glue to stick, shape a piece of wood to fill the groove, and glue it in. Then reshape the groove.
If the new string is thicker than the one it replaces, the clearance angle becomes greater for that string and less for its neighbours. Widen the groove if that is necessary for the thicker string to sit comfortably in its bottom. Then check the clearance angle of that string and its neighbours, and see if the string needs lowering. If it does, file the groove deeper until the clearance angles are right.
4) The glued bridge of a plucked instrument
Replacing a thicker with a thinner string involves no problems. Replacing a thinner string with a thicker one has the only problem that the hole for it might have to be made bigger. In some cases it can be drilled with a drill bit in a pin vice, if necessarily turned by hand. A mouse-tail file or a broken round (all-directions) hack-saw blade usually work. If the space between the bridge hole and the top of the bridge gets wafer thin, take all of the strings off and glue a thin strip of hardwood across the top of the bridge.
It is remarkable how some inaccuracies in hole placement can be compensated for with thick gut basses. The tugging mentioned at the end of section A2 gets the heights above the soundboard right. The loops around the strings of a course butt up against one another and automatically create an acceptable space between them.
D: REPLACING METAL STRINGS
There were several arrangements for holding the strings at the other end from the tuning pegs. A short metal rod or pin can be set into the tail block near the lower edge of the instrument, or into the bridge itself. A loop twisted into the end of the string goes over such a rod or pin. Another arrangement is the comb, where a piece of wood with slots sawn out to guide the strings is at the tail end of the instrument. These comb ends occurred on carved Italian citterns, and were integral with the carved sides. They have a hollowed surface region beneath, where a loose metal rod (held only by the strings) fits across its width. A unison pair of strings is mounted at one time in one length. The wire goes around the metal rod, is fed through the appropriate adjacent slots in the comb, and wound around both pegs. When tuning up, the two pegs are turned a bit at a time alternatively until reaching the final pitch.
The other arrangement is for hardwood or ivory tail-pegs set into the tail block near the lower edge of the instrument.. The strings can be mounted individually by loops twisted in their ends, or with a unison pair at a time, going around the tail-pegs, as going around the metal rod in the previously described method.
Plain wire can be bought with loops already twisted into their ends, or as a coil of wire (see the next section for instructions on making a loop). Twisted brass strings have a loop on one end because of how they are made. If the string stop is short enough, and one wants to use a single length for a doubled-back unison course, the loop at the end has to be cut off. After being tuned up, twisted-brass or thicker plain brass strings might be reluctant to take required bends at the nut and tail of the instrument, and so may require some help in bending by pressing with a finger. This may be required for the string to sit properly in the nut groove.
E. MAKING LOOPS ON WIRE STRINGS
The basic principle of making loops on the ends of wire strings that do not tighten up on the pin or tail peg that they go onto (like a lasso) is to start off with an equal twist of the two pieces of wire (like a twisted string) for a number of turns and then close-wind (like on a wound string) the end piece of wire onto the working length of wire for another number of turns. For each of these numbers, 3 or 4 full turns is usually enough. One needs a hook thick enough so that when the loop is created around it, the diameter is big enough to go over the the pin or the head of the tail-peg. The hook is firmly set into a handle for turning by hand. The axis of the hook is the direction one turns around.
One can get the first twist as follows: The short and long ends on each side of the hook are each held under some tension at 45 degrees angle to the hook axis (90 degrees to each other), and then the hook is turned. The long end should be protected from damage by being held by pliers (by an accomplice) or a fixed clamp with leather between the jaws and the wire. This type of twisting also twists each wire around its own axis between the loop and the points of holding the wire on each side. Such twists can easily break wires, so after a couple of turns, release both ends to relax this twist, and then pick them up again to continue. If breaking still occurs, relax the twist after each turn and/or increase the distance between the holding points and the hook (thus distributing the same total twist over a greater length).
To get the second twist, while one turns the hook, have most of the tension between the hook and the long end, leaving just enough tension on the short end to wrap tightly around the long end (if one continues twisting away from the hook) or around the twisted wire (if one doubles back, twisting towards the hook).
A somewhat different method recommended by Malcolm Rose is shown here:
Find a metal hook with diameter greater than the pin or head of the peg over which the final loop must go on the instrument. Fix that hook into the end of a handle. Cramp the wire between leather pads about 2 metres from the hook (around which it is looped), with the other end held by pliers. Turn the hook to make 4 loose turns (the following illustration shows fewer turns).
Let go with the pliers and reverse 4 turns to relieve the twist in the string.
Make a few close turns over the first loose windings.
Gently hold the close turns and the end of the wire with the pliers, and turn until the wire is twisted evenly together.
There are two methods of finishing off the end of the wire so that when mounted on the instrument it doesn't scratch the skin or catch the clothing. One is to clip it off as close to the last twist as possible, and with pliers (without leather), squeeze the last little bit into the finished tail of the loop at the right spot to complete the last twist. A bit of filing can round off any remaining sharp edges
The second method is to leave an end about 5 mm long sticking straight out perpendicular to the string, preferably in the plane of the loop. This method only works if the tail of the loop lies along a piece of the instrument. Pick the way that loop goes over the pin or tail peg such that the sticking-out bit is on bottom, against the instrument. When the string is tuned up, there is some tendency for the twistings to untwist, and this presses the sticking-out bit against the instrument, thus both keeping it out of harm's way and preventing further untwisting. With this method, is is possible to get away with leaving out the first twist and using only the second.
This last method is particularly useful for bandoras and orpharions where the short distance between the pin in the bridge for the string loop and the bridge bar requires a particularly short loop tail. One may only have room for a few twists, and then the sticking-out bit of of wire is essential to prevent untwisting when the string is tuned up.
F: TYING FRETS
At the end of the piece of fret gut, make a loop (without kinking it) whose diameter is a bit greater than the width of the fingerboard. Hold both ends of the loop in one hand and gently feed it between the fingerboard and the strings from the bass side of the neck (I). Hook the loop with a finger of the other hand as it comes out the treble side. Pull the loop around the back of the neck to the bass side while, with the first hand, holding firmly to the end of the gut and controlled letting enough of the rest of the gut feed to slip out for this to happen.
At this point one should check that everything is OK, and fix it if it is not. Make sure no strings are on the wrong (fingerboard) side of the loop. Make sure that bits of the gut have not crossed above the fingerboard or at its edge or around the back of the neck. Shift the end of the gut from the first hand to the second without releasing the rest of the gut from the first hand or the loop from the second hand. We should now have the loop in the middle with the end on one side and the rest of the gut on the other side, with no crossovers along the way (II). Let us define 'down' as the direction from the fingerboard to the back of the neck.
Now make another loop by running some of the rest of the gut held in the first hand over the tip of the index finger of that hand. Poke that second loop with that finger downwards through the first loop at an angle towards the gut end in the other hand (III), and then poke the gut free end downwards through the second loop (outside the first) (IV). Grab the end on the other side of the second loop with the first hand and pick it up again by the second hand. Remove all fingers that shape or constrain loops, firmly grasp the gut in each hand, and work the fret tight around the neck (so it is pressed against the fingerboard) and the fret knot (that has just been made) tight within itself. The proper position for the knot is a few mm down the neck from the fingerboard edge on the bass side.
One wants the gut to closely follow the sharp bends at the edges of the fingerboard. To do this, one must make it very flexible at these points, and that involves destroying the bonding between the fibres in the gut which gives it stiffness. This is also needed to get a tight knot. One way to flex the gut at the fingerboard edges is to get the fret knot as tight as one can by pulling both pieces of gut, and then tightening the fret further by sliding it along the fingerboard towards the bridge. It is then slid back again, the knot tightened, and the process repeated. Another way is to pull the fret tight and then pull it up and down a few mm, rotating the fret back and forth around the neck at the position it was tied (which is closer to the nut than it intended final position).
To get the knot tighter one can alternate pull the gut ends away from the knot on both sides (parallel to the neck) and pulling perpendicular to the neck. It is also useful to, when pulling perpendicular to the neck, to alternate pulling one side only and then the other, changing the shape of the knot each time.
When all this flexing of the gut is accomplished, one tightens it as much as one can at a position closer to the nut than its final position, adds an over-and-under knot to the fret knot (V), and slides the fret to its final position. If it is tight, a piece of wood with a sharp square edge can work as a pusher, sliding the fret along the side of the fingerboard edge, a little at a time alternating between the two sides. The wooden pusher can save the breaking of fingernails. The fret is finished off by cutting the gut 2 or 3 mm from the last knot, and if one wishes, by swelling the ends with a small flame or a hot soldering iron, to seal it. Some make a neater job by doing this swelling on the original fret knot, and not bothering with the second knot.
G: STRING GROOVE SHAPES IN THE NUT AND BRIDGE
The string should ride on the bottom of the groove and not touch the sides. Grooves can be too shallow, too deep, too narrow, but only too wide if the string wanders from its proper place on the nut.
If shaping a groove properly would make the string come too low , then in the case of a nut, it can be raised by a thin shim (early books mention the use of playing cards), and adjust the other grooves. In the case of a bridge the wood around the groove can be cut away, a small piece of wood carved to fit the cut glued in, and a new groove filed in it.
Raising the bridge feet may be necessary. Gluing in a wood shim can be very effective, but if done, always claim that it is a temporary emergency measure because it is 'not done' by the aristocrats in the violin world, who insist on (and charge for) bridge replacement. Accurate refitting of the feet is desirable. For this, it is best to set up a jig so that the bridge can slide about a cm up and down the soundboard around its proper position without deviating from its proper tilt. Then hold some sandpaper on the soundboard and rub the bridge back and forth over it. If the initial fit is poor, this process can be speeded up by carving a sliver away everywhere and only where one sees the sandpaper marks.
Shaping a groove is done with a round file of somewhat larger diameter than the string. The ends of a groove should be slightly chamfered in all directions to avoid the sharp edges catching the string during tuning. It is often helpful to polish the groove with a piece of string dipped in a fine abrasive, such as chalk.
When changing to thicker strings the grooves in the nut should not be deepened when they are widened. Here, the distance from the bottoms of the strings to the fingerboard need to be preserved Grooves in the bridge may need deepening as well as widening. Here, the positions of the tops of the strings, where the fingers or bow contact them, are most important. When changing to thinner strings, the nut can be used as is, but the bridge grooves may need to be raised as described above.
Sections through grooves:
H: PEG FITTING
Wood swells or contracts with changing humidity different amounts in different directions. The swelling is most in the tangential direction (going around the circumference in the original log), about half of that in the radial direction (going from the centre of the original log outwards), and hardly at all in the grain direction (along the axis of the original log). Harder woods swell or contract for the same change of humidity about as much as softer woods, the only essential difference being that harder woods are less compressible, so they exert stronger forces against any hindrance when they change dimension.
Holes that are drilled and reamed in pegboxes go perpendicular to the grain direction. The cross-section of the hole is round when just reamed, but will tend not to remain so when the humidity changes. The dimension of the hole along the grain direction hardly changes at all, but the direction perpendicular to it does. The difference is minimised if the other direction is the radial one (perpendicular to the rings), but this is not necessarily an advantage.
For strength, pegs are turned so that the grain direction is along the peg shaft. When freshly turned, the cross-section of the shaft is circular, but when the humidity changes, it tends to go oval, with the tangential direction swelling or contracting about twice as much as the radial direction.
Consequently, at any humidity other than that at which the pegbox hole was reamed or the peg shaft was turned, there is a tendency to have an oval cross-section peg turning in an oval cross-section hole. This is the norm when we use pegs, and yet they usually still work. If both the peg and the pegbox were made of particularly hard wood, the peg cannot be made to turn smoothly if the humidity is not just right. For pegs to work, we need some of the wood involved to be compressible.
In medieval times, pegs were made of particularly soft hardwoods, and their sponginess made up for any deficiencies in the shaping of the pegbox hole and the peg shaft. In the Renaissance and early baroque, with instruments made by professional makers, pegbox holes and pegs appear to have been more accurately made, and medium-hard hardwoods such as fruitwoods were used for pegs, and similar woods like maple and beech were used for pegboxes. There was enough compressibility in each to allow free turning of the pegs once pressed in. Later in the baroque, fashion changed towards pegs being made of hard hardwoods like boxwood and ebony, requiring almost all of the compression to be in the softer pegbox wood.
At the bearing surface of the peg shaft in the pegbox hole, the frictional force depends on the normal force and the coefficient of friction. The coefficient of friction depends on the material on the surface (usually applied to get the friction just right), and the normal force depends on how far the cone of the peg shaft is pushed into the cone of the pegbox hole, and on the compressibility of the wood on each side of that surface. The total friction is the sum over all of the surface in contact.
There is very little compressibility along the grain direction in any wood. Thus the frictional force holding the string's tension is created by the compressibility of the pegbox wood in the direction perpendicular to the grain direction, and in both directions in the cross-section of the pegbox shaft, modulated by the coefficient of friction. The peg can only turn smoothly if the peg is not pushed into the hole so far that during rotation, the most incompressible dimension of the peg-shaft cross-section encounters the relatively incompressible grain-direction dimension of the pegbox hole. If the peg is of a hard hardwood, so that all directions are relatively incompressible, any ovalness in its cross-section limits how far it can be pushed in and still be smooth turning. The grip is then almost all due to the compressibility of the pegbox wood, and to ensure this for a wide range of humidities, the pegbox holes should preferably be reamed during a period of high humidity. I would expect that if the pegbox were made of highly figured wood, where the grain directions get rather mixed up, the compressibility, and thus the grip, would be reduced.
If not prevented from doing so, wood contracts with age. The relative amount in different directions varies the same way that it does when there is a humidity decrease. This raises the humidity that will give a circular cross-section when the wood gets older. The rate of age contraction is greatest when the wood is new. This is the main reason for making instruments out of well seasoned wood. Assuming that the pegbox hole was reamed and the peg shaft was fitted at a particular humidity, with time, at that humidity, these cross-sections tend to become oval. The pegbox hole tends to contract almost exclusively in the direction perpendicular to the grain. If it had a hard hardwood peg in it during that time, it would have been prevented from contracting any more than the peg. Re-reaming the hole to roundness is not necessary because the wood removed would be in the most compressible direction, and the contraction probably would improve grip on the peg. But ovalness in such pegs does require correction because it limits how far the peg can be pushed in and not bind. This is usually necessary within a year of the making of a new instrument, and periodically afterwards.
The procedure for refitting a peg is quite straightforward, though it can be time-consuming. One pushes it into the hole as far as it will go without binding when it is turned, turn it, and pull it out. Observe where the surface of the peg shaft is very shiny, and scrape or sand or file away a small amount only at the very shiny surface areas, and at all of those areas. Then put the peg back in the hole, turn it again, and again observe the shiny areas, which should cover a bit more of the bearing surfaces than before. Remove only the shiny surface again.
Repeat this process until all of the bearing surface in the side of the pegbox nearest the peg head is shiny when the peg is pulled out, and then one is finished. If the bearing surface on the other side of the pegbox gets all shiny first, don't stop. We don't want that end of the peg shaft to be gripped more strongly by the pegbox than the one nearest the peg head. The peg twists a bit between where it is held most strongly and the head being turned. If the twist extends down to thinner (and thus weaker) parts of the peg shaft, there is an increased chance for the peg to split. Also, any twist where the string leaves the peg straightens out when one lets go of the head, and that leaves the string slightly flatter than it was while being tuned.
If the friction against turning the peg is too little to hold the string tension, take the peg out and rub a few strokes of chalk (or of commercial peg compound) across the shiny bearing surface (mostly on the one nearest the peg head). Work it in with a few turns of the peg in the pegbox. If it still doesn't feel right, repeat. If the friction is too great, applying a few strokes of dried hard soap will improve it. Repeat if necessary.
If an instrument has not been tuned for some time, one may find that a peg is quite stuck in the pegbox. Do not apply unusual force to try to turn it, since that can easily split the peg. A few light taps with a small hammer at the thin end of the peg in the direction of the head will free it.
J. MODIFYING THE ACTION
1) Straight fingerboard
The action of an instrument involves how far one has to press the strings against the fingerboard or the frets to stop notes, and how this varies along the fingerboard. If the fingerboard is straight (or the tops of the frets are along a straight line), the action is characterised by the angle between that straight of the fingerboard or frets and the bottoms of the strings. On the same type of instrument, a player that plays softer or uses higher-tension strings can be happier with a smaller angle (lower action) than a player who plays harder or uses lighter tension strings. The angle is usually less than a degree, and I've found that a good midling action for viols is when the distance between the bottom of the string and the top of the 7th fret is about 1/200 (one two-hundredth) of the string stop.
If the action is too low, the vibrating strings slaps against the fingerboard or against frets further along the fingerboard. If the action is too high, one has to exert unnecessary excess force to stop the strings. The usual way of changing the action is by raising or lowering where the strings leave the bridge. On gut-strung instruments with glued bridges, some adjustment of this position is possible, as mentioned in section A 2). If such adjustment is not enough, one can change the action angle by varying the heights of the frets. Otherwise, one needs to apply radical surgery to the neck or fingerboard. On instruments like bandoras, one can replace the bridge saddle with a higher one or file the one that is there lower. On instruments with unglued bridges, the bridge height needs to be increased or decreased. Increasing the height is briefly discussed in the third paragraph of section G. The height can be decreased by cutting deep grooves for the strings, usually accompanied by taking wood off the top because it looks better.
If the fingerboard is straight and slapping of the strings occurs, it happens near the nut, and not at some distance along the fingerboard away from the nut. If there are tied frets, their diameters can often be varied to alleviate the problem. First make sure that the problem really is one of action, and not just a slightly loose fret that is not lying flat on the fingerboard. If the problem is with the action, find the fret farthest from the nut that shows the problem and replace it with a slightly thicker one. If that does not solve the problem with that fret, try a thicker one yet. Once the problem with that fret is solved, one needs to do the same with the next fret closer to the nut, starting with a diameter slightly thicker than the one that worked on the previously changed fret. Once that one is fixed, do the next, and so on, until one gets to the nut, which one raises with shims until the problem is solved there too. If there are more than 3 or 4 frets involved in this process, the fret diameters could get so alarmingly large that one is likely to abandon this procedure.
Many players adopt graded frets, with the thickest fret nearest the nut, and progressively thinner frets the farther from the nut they are. This is often done not because of action considerations, but just because early writers wrote that the frets were graded. It is possible, perhaps even likely, that early players used high frets near the nut for bending pitches by varying pressure. When near the nut, it not as easy to bend pitches by sliding strings sideways as it is with frets farther from the nut. But modern players don't bend pitches, so the only effect grading frets usually accomplishes is to increase the action angle. If the maker expected graded frets to be used, he or she would have adjusted the neck angle so that with graded frets, the action would be appropriate. Similarly, if the maker expected uniform frets to be used, he or she would have set the neck angle for a good action with uniform frets. Unless there are problems with the action of the instrument, the issue of using graded frets or not should be decided on the basis of the maker's intention rather than authentic practices.
2) Hollowed-out fingerboard
The farther from the nut one stops a string, the farther one has to press the string, and more force is needed. Ease in playing is the reason to keep the fingerboard as close to the string as possible. If the fingerboard is too close to the string, when the string is vibrating, it slaps against the fingerboard near where it is stopped. A good action angle is one between the string and the fingerboard that is just large enough to avoid the slapping with the maximum vibration amplitude the string will have in playing. If one keeps constant the local action angle (the angle between the string and the fingerboard surface as they leave the stopping finger), the tendency for the string to slap (or the tendency not to slap) is likely to be the same all over the fingerboard. This makes the action about as easy to play as one can get it. A constant local action angle leads to a fingerboard shape that is a logarithmic spiral. That curve can be approximated by a circle that goes through the nut and is tangent to a line parallel to the string at a distance from the nut of 0.63 times the nut-to-bridge distance (string stop). If a string is stopped at that point along the fingerboard, it would sound slightly higher than an octave and a fourth above the open string.
One has has first to determine an optimum action angle that works well near the nut with a straight fingerboard. Let us use as a measure of this action (of a straight fingerboard) a ratio that shall be called 'h'. It is the height of the bottom of the string above the top of the 7th fret (or if frets are not used, the fingerboard at the position of fingering the fifth, at 1/3 of the string stop from the nut) divided by the string stop (the distance from nut to bridge). I’ve found that for viols, a good action is achieved with h = 1/200. That ratio tends to be a bit larger with violin-type instruments and with the double bass, and may be different for different strings on the same instrument.
The practical procedure is as follows. One starts with a fingerboard of length L that is accurately straight in the direction of the strings, and make a mark at half the fingerboard length. Let us call the string stop 'S', and then calculate p = 0.60 hL(L/S), which is the depth of a channel to be cut across the fingerboard at the marked half-way point. One also has to calculate k = 3hL(1 - 0.79L/S), which is the distance from the bottoms of the strings to the end of the fingerboard (for a straight fingerboard, k = 3hL). One needs k to fit the fingerboard on the neck and be at the right height for the bridge.
The bottom of the channel cut in the fingerboard and its two ends are on the final circular curve. If one has a good eye, one can, from these three points, shape a uniformly circular curve along the fingerboard.
If one does not trust one's eye, one can use the middle 2/3 of a uniform stick, bent just the right amount from the ends, as a guide. Another guide could be a flat edge with thin strips of shim glued to it at intervals of an eighth of the fingerboard length. The shim heights from one end of the fingerboard length to the other should be 0, 7/16, 3/4, 15/16, 1, 15/16, 3/4, 7/16 and 0 times p. Actually, these figures are for a parabola, but at these shallow curvatures, there is no practical difference between a parabola and a circle.
Let us illustrate this with the above viol example. As before, h = 1/200. Assume a modern bass viol with S = 690 mm, and L = 460 mm (2/3 S). If the fingerboard was set as prescribed for a straight fingerboard, the end would be 3hL or 6.9 mm from the string. With the hollowed-out fingerboard, that distance is k = 3hL(1 - 0.79L/S), which is 3.3 mm. So the end is less than half the distance from the string of a straight fingerboard. The amount of hollowing out at the centre of the fingerboard is p = 0.60 hL(L/S), which is 0.9 mm.
This amount of hollowing is not particularly noticeable, but with the end much closer to the string, it makes playing in high positions much easier. If one is not sure of the evenness of the curving of the fingerboard, one can set its end a little more than k away from the string. If a fingerboard has tied frets, one can simulate the curve for the tops of the frets on a straight fingerboard by varying the fret thicknesses.
Quite a few instruments, especially those that use high positions very often (like the violin, viola, cello and double bass) are now made with such curved fingerboards. I doubt whether the makers use a theory as given above, but the effect can be achieved by trial and error. The curvature may be different for treble and bass strings, leading to a slightly twisted fingerboard. This twisting is in addition to the twisting that is sometimes put into the fingerboard to make the first string on the violin or the fourth string on the cello easier to play. Uniformity in shaping the fingerboard curvature is important here, and only a skilled woodworker should attempt to do this hollowing-out procedure.
The geometrical derivation of the formulas given here are in FoMRHI Comm. 1621, where a refinement working with the logarithmic spiral (rather than the circular approximation used here) is also offered.